
In this article you will learn how to setup a VPS and install jschan an imageboard software written in JavaScript running on NodeJS. We will walk you through basic security, installing jschan, configuring our server, and how to use Cloudflare to protect our website from DDoS and malicious users.
This guide requires you to have basic familiarity with Linux, the terminal, access to a Virtual Private Server (VPS), and a domain registered with Cloudflare. How to obtain a VPS or domain is out of scope with this guide, and we will assume you have access to both.
NOTE: Throughout this guide, you will be prompted or asked to set a password. We recommend that you only use long (16-32) randomly generated strings with no special characters and store them in a password manager of choice.
Setup the VPS
In this section we install software updates, install necessary tools, and setup essential protection for our server. Begin by opening a remote shell to your root user at your server’s IP with:
ssh root@<IP>
On any Linux machine, our first step is to always update:
apt update && apt upgrade -y

apt install -y sudo gnupg gpg lsb-release curl ufw git ffmpeg imagemagick graphicsmagick fontconfig fonts-dejavu
In the above command we installed the UFW firewall service, and we will configure it to deny all incoming requests by default. We also need to allow SSH or we will lock ourselfs out! It’s recommended to also only allow SSH connections from your IP
ufw default deny incoming
ufw default allow outgoing

# The LIMIT rule will ratelimit connections.
ufw limit ssh

ufw enable
ufw status verbose
We will need to disable the root account, but first we need to create
an admin user part of the sudo group. The sudo group will grant it
the rights to run commands with root privileges.
adduser admin

usermod -aG sudo admin
usermod -aG www-data admin

# Verify that the admin user is part of the sudo group.
groups admin
In Linux, using the root account is dangerous and risks irreversible consequences. We also create a defense-in-depth with a seperate admin user. Now with our new admin user, we verify SSH login by opening a new terminal (NOTE: we keep our root shell still open!):
ssh admin@<IP>
From this point onwards, all commands will be executed in the admin user
shell. You can also close the root SSH connection. Next we configure SSH
by first creating a backup of the config file:
sudo cp /etc/ssh/sshd_config /etc/ssh/sshd_config.bak
Open and modify the /etc/ssh/sshd_config file and set these lines:
PermitRootLogin no
KbdInteractiveAuthentication no
ChallengeResponseAuthentication no
AllowUsers admin
Root SSH login is disabled, a few other things we won’t need, and now only the admin user may open an SSH connection. We test our changes:
sudo sshd -t
sudo sudo systemctl restart ssh
While keeping your current admin SSH connection open, attempt to open a
SSH connection with the root user. Next attempt to connect with the admin
user. Root should fail but your admin user should succeed. The next step
is locking the root user:
sudo passwd -l root

# Verify the root user is locked, you should see an "L"
sudo passwd -S root
Keeping our system up to date is very important, and on Debian 13 we can enable automated updates:
sudo apt install -y unattended-upgrades apt-listchanges
sudo dpkg-reconfigure -plow unattended-upgrades
For a web server, using UTC time is also important.
timedatectl
sudo timedatectl set-timezone UTC
timedatectl
The VPS should now be ready to run jschan.
Install jschan
Installing jschan is relatively simple, the most difficult step is after it where we will need to configure our NGINX server together with Cloudflare.
Prerequisites
Because jschan is a service our server will provide to our users, it is good
practice to create a dedicated jschan user. We will grant it rights to only
read/write/execute inside a single directory and make it part of the www-data
group. This user will not have sudo privileges.
sudo adduser jschan

sudo usermod -aG www-data jschan

sudo passwd -l jschan

# Verify the user is locked, you should see an "L"
sudo passwd -S jschan
Let’s create a folder for our website to store all its files in:
sudo mkdir -p /var/www/jschan
Unfortunately, on Linux file permissions are broken as a feature.
We need to change ownership of this new directory to our jschan user
and grant members of the www-data group read rights.
sudo chown -R jschan:www-data /var/www/jschan

sudo chmod -R 750 /var/www/jschan
Install MongoDB
MongoDB is the database jschan relies on store users, posts, files, etc. You can follow the official documentation but I included the information in this article:
curl -fsSL https://pgp.mongodb.com/server-8.0.asc | \
    sudo gpg -o /usr/share/keyrings/mongodb-server-8.0.gpg \
    --dearmor

echo "deb [ signed-by=/usr/share/keyrings/mongodb-server-8.0.gpg ] https://repo.mongodb.org/apt/debian bookworm/mongodb-org/8.0 main" | sudo tee /etc/apt/sources.list.d/mongodb-org-8.0.list

sudo apt update

sudo apt install -y mongodb-org

sudo systemctl enable --now mongod

# Verify the database is running.
sudo systemctl status mongod
The last step is initializing our database and setting a strong password.
# NOTE: change-me needs to be replaced!
mongosh admin --eval "db.getSiblingDB('jschan').createUser({user: 'jschan', pwd: 'change-me', roles: [{role:'readWrite', db:'jschan'}]})"

sudo sh -c "cat > /etc/mongod.conf" <<'EOF'
storage:
 dbPath: /var/lib/mongodb
systemLog:
 destination: file
 logAppend: true
 path: /var/log/mongodb/mongod.log
net:
 port: 27017
 bindIp: 127.0.0.1
processManagement:
 timeZoneInfo: /usr/share/zoneinfo
security:
 authorization: "enabled"
EOF

# Restart database service and apply changes.
sudo systemctl restart mongod

# Verify the database is healthy.
sudo systemctl status mongod
Install Redis
Redis is another essential component to cache frequently accessed information and speed up our website!
curl -fsSL https://packages.redis.io/gpg | sudo gpg --dearmor -o /usr/share/keyrings/redis-archive-keyring.gpg

sudo chmod 644 /usr/share/keyrings/redis-archive-keyring.gpg

echo "deb [signed-by=/usr/share/keyrings/redis-archive-keyring.gpg] https://packages.redis.io/deb $(lsb_release -cs) main" | sudo tee /etc/apt/sources.list.d/redis.list

sudo apt update && sudo apt install -y redis

sudo sed -i -e 's/supervised no/supervised systemd/' -e '$!b' -e '/# supervised auto/!b' -e 's/# supervised auto/supervised auto/' -e '$!s/$/\nsupervised systemd/' /etc/redis/redis.conf

sudo systemctl enable --now redis-server
We do the same as we did for our database, and set a password to access Redis.
# NOTE: change-me needs to be replaced!

echo "requirepass changeme" | sudo tee -a /etc/redis/redis.conf

sudo systemctl restart redis-server
Install NGINX
NGINX sits between the internet and our application. It secures responses with TLS, adds information such as visitor country, and appropriately routes them.
sudo apt install -y nginx
sudo systemctl enable --now nginx

# Verify the NGINX service is healthy.
sudo systemctl status nginx
If you attempt to visit your server IP in the browser at http://<IP> it will not respond and the
browser will timeout. Because we did not allow HTTP traffic in our firewall, it will deny it by
default. But before we show you how to enable it, it’s important to understand that when we use
Cloudflare we will only allow HTTPs traffic from a specific set of IPs. This is a temporary fix
and we will remove the rule to block HTTP again.
sudo ufw allow http

# Verify the rule exists.
sudo ufw status
Now you can visit your server in the browser at http://<IP> and be greeted with a test page.
Remove the rule with:
sudo ufw delete allow http

# Verify the rule is deleted.
sudo ufw status
Install Node.JS and run jschan
Everything is in place for us to install and run jschan. We will run the software from our
jschan user so first we need to switch shells into it:
sudo su - jschan
Inside the jschan user shell we run the following command to install NodeJS:
curl -o- https://raw.githubusercontent.com/nvm-sh/nvm/v0.40.4/install.sh | bash

\. "$HOME/.nvm/nvm.sh"

nvm install 24

# Verify nodejs is installed
node -v
npm -v
We use git to clone the jschan code into the folder we created earlier:
git clone https://gitgud.io/fatchan/jschan.git /var/www/jschan

cd /var/www/jschan

cp configs/secrets.js.example configs/secrets.js

# Only allow jschan user to write/read/execute the secrets file.
chmod 700 configs/secrets.js
Edit the configs/secrets.js and fill in the secret values you set earlier.
Further below are values for secrets used in hashing IP, post passwords etc.
Generate four different values and save them. Finally we initialize the database
and start jschan:
npm install
npm run-script setup

# NOTE: Save the admin user password!
npx gulp reset

npx pm2 completion install
npx pm2 startup

npm run-script start
npx gulp
npx pm2 save
JSChan is now running locally on port 7000, you can verify by using curl to request the home page:
curl http://localhost:7000/index.html
Before we make it accessible to the world wide web we need to configure Cloudflare and NGINX.
Configure NGINX and Cloudflare
In this section, we set up NGINX and Cloudflare to work together and secure our site.
Cloudflare
Visit your domain on Cloudflare website, and make sure this setting is enabled under Network tab.
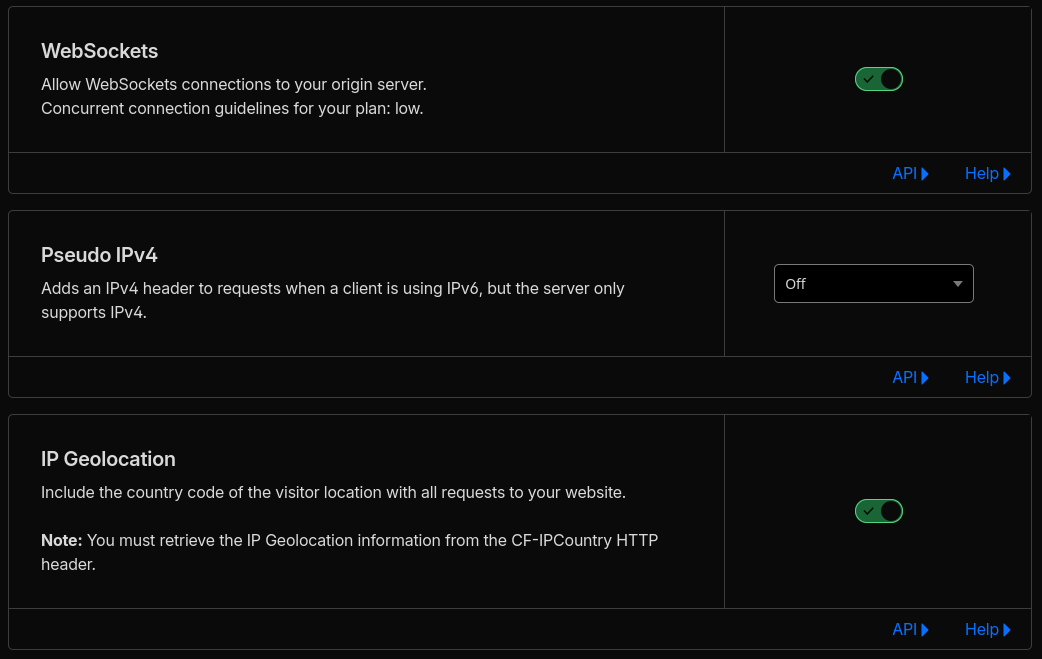
Go to SSL/TLS > Overview and click Congfigure and set Custom SSL/TLS to Full (Strict).
Next go to SSL/TLS > Origin Server and click Create Certificate and use the defaults. While keeping the page open (do not close!), create the following files:
sudo mkdir -p /etc/nginx/ssl/example.com

# Paste the origin certificate.
sudo nano /etc/nginx/ssl/example.com/origin.pem

# Paste the private key.
sudo nano /etc/nginx/ssl/example.com/origin.key
You can now close the page where you generated your certificate, next we need to fix permissions:
sudo chown -R root:root /etc/nginx/ssl/example.com

sudo chmod 755 /etc/nginx/ssl
sudo chmod 755 /etc/nginx/ssl/example.com

sudo chmod 644 /etc/nginx/ssl/example.com/origin.pem
sudo chmod 600 /etc/nginx/ssl/example.com/origin.key
NGINX
cd /var/www/jschan

sudo cp /etc/nginx/nginx.conf /etc/nginx/nginx.conf.bak

sudo bash configs/nginx/nginx.sh
You can use my inputs as references, the command will take a while to execute (about 10 minutes):
sudo bash configs/nginx/nginx.sh
[jschan nginx configuration helper]
Enter the directory you cloned jschan, no trailing slash. (blank=/var/www/jschan):
Enter your clearnet domain name e.g. example.com (blank=no clearnet domain): <YOURDOMAIN>
Enter tor .onion address (blank=no .onion address):
Enter lokinet .loki address (blank=no .loki address):
Would you like to add a www. subdomain? (y/n): n
Run certbot and automatically configure a certificate for https on clearnet? (y/n): n
Generate a self-signed certificate instead? (y/n): n
Warning: no https certificate chosen for clearnet. Continue without https? (y/n): y
Should robots.txt disallow compliant crawlers? (y/n): n
Allow google captcha in content-security policy? (y/n): n
Allow Hcaptcha in content-security policy? (y/n): n
Allow Yandex SmartCaptcha in content-security policy? (y/n): n
Download and setup geoip for post flags? (y/n): n
Is this correct?
jschan directory: /var/www/jschan
clearnet domain: <YOURDOMAIN>
.onion address:
.loki address:
www subdomains: n
certbot https cert: n
self-signed https cert: n
no https cert: y
robots.txt disallow all: n
google captcha: n
hcaptcha: n
yandex captcha: n
geoip: n
(y/n): y
The command will fail to restart nginx, but that’s okay! We will fix it.
Open and edit /etc/nginx/sites-available/anthrofoo.com.conf:
upstream chan {
        server 127.0.0.1:7000;
}

server {
        server_name example.com;
        client_max_body_size 0;

        ssl_certificate /etc/nginx/ssl/example.com/origin.pem;
        ssl_certificate_key /etc/nginx/ssl/example.com/origin.key;

        include /etc/nginx/snippets/security_headers.conf;
        include /etc/nginx/snippets/error_pages.conf;
        include /etc/nginx/snippets/jschan_clearnet_routes.conf;
        include /etc/nginx/snippets/jschan_common_routes.conf;

        listen 443 ssl;
        listen [::]:443 ssl ipv6only=on;
}
Next open and edit /etc/nginx/snippets/jschan_clearnet_routes.conf
with the following contents:
location / {
        proxy_buffering off;
        proxy_request_buffering off;
        proxy_pass http://chan$request_uri;
        proxy_http_version 1.1;

        proxy_set_header Host $host;
        proxy_set_header Upgrade $http_upgrade;
        proxy_set_header Connection 'upgrade';
        proxy_cache_bypass $http_upgrade;

        proxy_set_header X-Forwarded-Proto http;
        proxy_set_header X-Forwarded-For $proxy_add_x_forwarded_for;
        proxy_set_header X-Real-IP $remote_addr;
        proxy_set_header X-Country-Code $http_cf_ipcountry;
}

location @backend {
        proxy_buffering off;
        proxy_request_buffering off;
        proxy_pass http://chan$request_uri;
        proxy_http_version 1.1;
        proxy_set_header X-Forwarded-Proto http;
        proxy_set_header X-Forwarded-For $proxy_add_x_forwarded_for;
        proxy_set_header X-Real-IP $remote_addr;
        proxy_set_header X-Country-Code $http_cf_ipcountry;
        proxy_set_header Connection '';
        proxy_set_header Host $host;
}

location @backend-private {
        include /etc/nginx/snippets/security_headers_nocache.conf;
        proxy_buffering off;
        proxy_request_buffering off;
        proxy_pass http://chan$request_uri;
        proxy_http_version 1.1;
        proxy_set_header X-Forwarded-Proto http;
        proxy_set_header X-Forwarded-For $proxy_add_x_forwarded_for;
        proxy_set_header X-Real-IP $remote_addr;
        proxy_set_header X-Country-Code $http_cf_ipcountry;
        proxy_set_header Connection '';
        proxy_set_header Host $host;
}
Next we instruct NGINX to trust Cloudflare headers. Create the file:
sudo nano /etc/nginx/conf.d/cloudflare-realip.conf
And fill the following values:
# sourced from https://www.cloudflare.com/ips/

real_ip_header CF-Connecting-IP;

#IPv4
set_real_ip_from 173.245.48.0/20;
set_real_ip_from 103.21.244.0/22;
set_real_ip_from 103.22.200.0/22;
set_real_ip_from 103.31.4.0/22;
set_real_ip_from 141.101.64.0/18;
set_real_ip_from 108.162.192.0/18;
set_real_ip_from 190.93.240.0/20;
set_real_ip_from 188.114.96.0/20;
set_real_ip_from 197.234.240.0/22;
set_real_ip_from 198.41.128.0/17;
set_real_ip_from 162.158.0.0/15;
set_real_ip_from 104.16.0.0/13;
set_real_ip_from 104.24.0.0/14;
set_real_ip_from 172.64.0.0/13;
set_real_ip_from 131.0.72.0/22;

#IPv6
set_real_ip_from 2400:cb00::/32;
set_real_ip_from 2606:4700::/32;
set_real_ip_from 2803:f800::/32;
set_real_ip_from 2405:b500::/32;
set_real_ip_from 2405:8100::/32;
set_real_ip_from 2a06:98c0::/29;
set_real_ip_from 2c0f:f248::/32;
Verify:
sudo nginx -t
sudo systemctl start nginx
sudo systemctl status nginx
Firewall
We set up our firewall to only accept HTTPs traffic from Cloudflare servers. Cloudflare publishes their IP lists at https://www.cloudflare.com/ips-v{4,6}
for cfip in `curl -sw '\n' https://www.cloudflare.com/ips-v{4,6}`; do sudo ufw allow from $cfip to any port 443 comment 'Cloudflare IP'; done

# Verify new rules exist.
sudo ufw status
Final steps
Now we point our domain to our server, go DNS > Records and create a DNS record and enter your server IP.
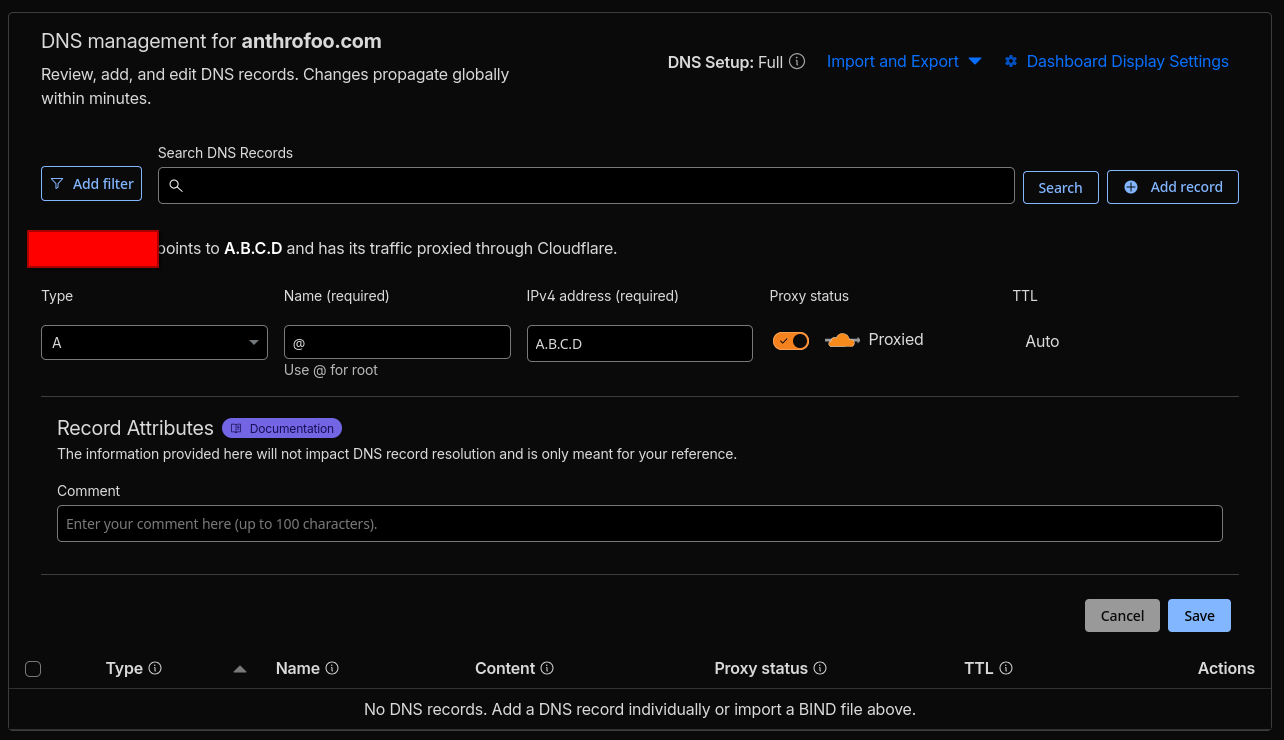
You can now visit your domain and see your imageboard!